Parents who are looking for piano lessons, guitar lessons and music theory lessons for their children don't have to look any further. I have posted some very easy guitar, piano and theory lessons on this blog especially for beginners and will try my best to make each lesson as simple as possible. For those person who are interested in my music articles and would like to get early updates, just subscribe or follow me on this blog.
Please leave your comments. Say if you are learning anything and what topic you are most interested in. By leaving your comments I will be able to know what topic I should discuss each week.
HAVE A GREAT DAY!!!
Saturday, 16 April 2011
Guitar Lesson for Beginners Part 4 - Learn to play "Happy Birthday To You".
In the last guitar lesson, I have illustrated to you how to play "Mary Had a Little Lamb". I know that you are able to play that simple melody by now.
Today I will be showing you how to play another simple melody. This melody is "Happy birthday to you". By now you should be able to located most of the notes on your guitar. I know that you may have just started to play the guitar so I will be giving the you the simplest way to play this song.
Below is an illustration showing you the frets, strings and notes that you will use to play the song (Happy Birthday To You). Notice that there is a "high G" in the song which different the "G" you use to start the it.

Please try to know the notes on the guitar first before you try to play the piece. This will help you to be fluent when playing the song.
Learn more guitar lessons with:
Jamoramo Guitar Courses - Click Here Now!
{Copyright (c) April 2011 by Carlinton Singh}
NEW TO THIS BLOG! TAKE THE TIME TO VIEW OTHER MUSIC ARTICLES POSTED BY THE AUTHOR.
Today I will be showing you how to play another simple melody. This melody is "Happy birthday to you". By now you should be able to located most of the notes on your guitar. I know that you may have just started to play the guitar so I will be giving the you the simplest way to play this song.
HAPPY BIRTHDAY TO YOU,
G G A G C B
HAPPY BIRTHDAY TO YOU,
G G A G D C
HAPPY BIRTHDAY MY BROTHER,
G G G(high) E C B A
HAPPY BIRTHDAY TO YOU.
F F E C D C

Please try to know the notes on the guitar first before you try to play the piece. This will help you to be fluent when playing the song.
Learn more guitar lessons with:
Jamoramo Guitar Courses - Click Here Now!
{Copyright (c) April 2011 by Carlinton Singh}
NEW TO THIS BLOG! TAKE THE TIME TO VIEW OTHER MUSIC ARTICLES POSTED BY THE AUTHOR.
Tuesday, 12 April 2011
Piano Lesson - How To Play Major Scales On The Piano
A Major Scale is a group of eight notes beginning and ending with the same letter name. Each note in a major scale is played one after the other until it reaches the eight note. A Major Scale sounds like this: Doh, Ra, Me, Fa, So, Lah, Te, Doh.
The eight note is called an octave because it is the same letter as the first note but have a higher pitch. There are twelve notes in music and each note is the root of specific major scale. Hence there are twelve major scales in music.
Let us a look at the keyboard the main section of the piano.However, an octave can be lower or higher than the root note in a scale. There are twelve
The eight note is called an octave because it is the same letter as the first note but have a higher pitch. There are twelve notes in music and each note is the root of specific major scale. Hence there are twelve major scales in music.
In our lesson today I will teach you how to play the C major scale on the piano. Please read all instructions carefully and make sure you practice.
Let us a look at the keyboard the main section of the piano.However, an octave can be lower or higher than the root note in a scale. There are twelve

Now the scale that we are going to play is C Major. Here are the letters of C Major Scale.
C D E F G A B C
1 2 3 4 5 6 7 8
You should notice that the C major scale begins and ends with the same letter name. Now we will learn to play the scale with both hand in ascending and descending order. Ascending order means that the scale will be played from the first note to the eight note and descending order means that the scale will be played from the eight note to the first. In other words we will go forward and backward.
The fingers for both hands are labelled so that you can understand further illustrations teaching us how to play the C Major Scale on the piano.


The illustration below outlines the fingers used for the right hand when playing the C Major Scale.

(Please note - When play in ascending order the 1st finger will go under the 3rd finger to play the F key. Do this several times and then go the opposite direction using the same fingers.)
The illustration below outlines the fingers used for the left hand when playing the C Major Scale.

(Please note - When playing in ascending order the 3rd finger will go over the 1st finger to play the A key. Do this several times and then go the opposite direction using the same fingers.)
Remember to practice. You should practice playing the scale as slow as possible and then increase in speed as you continue. I know this lesson will help with your fingering techniques when playing the piano. I will be doing a video tutorial on this lesson soon. Thank you and have a wonderful day.
Copyright (c) April 2011 by Carlinton Singh.
Please remember to leave your comments.
Monday, 11 April 2011
Free Music Lessons Online for Children and Adults.
A number of time individuals such as students and teachers have been searching online for useful articles that would help them with their musical development. Finding using useful music articles are sometimes difficult. Some music articles do not share as much information so that one can benefit after reading. Some writers just place some information without trying to explain the basic techniques or methods that would allow the readers to feel fulfilled after they have read their articles.
With all these issues in mind, I am trying my best to send out some free music lessons for all those who are interested in music, whether practically and theoretically. The music articles that are published so far have generated great comments overall from interested persons.
It is important that you leave your comments after reading an article because your ideas are useful and will benefit others who are of the same interest. Remember to subscribe so that you can get an updated music lesson immediately after I have publish it. You can also follow this blog by clicking the follow button and sign up. This way you will be able to have an area for discussion on any music lesson or content published on this blog.
We intended to write music articles on music theory, how to play the piano, how to play the guitar and we will also have free music lessons on some wind instruments in the future. Other musical content will also be discussed. At this time, I hope you are enjoying our free music lessons and you are sharing the information with your friends. We believe in teaching you so that you can teach others.
For those persons who are new to this blog site, I would advice that you take a look on all the articles written. I know you will benefit, gain new ideas and will be a more rounded musician.
Have a great musical day!
Remember to practice hard and have patience.
Saturday, 9 April 2011
Music Theory - The Treble Staff
In our last theory lesson we did an article on the "Staff or Stave" and also the two main clef signs that are used on the staff, the Treble and Bass Clef.
In this music theory lesson we will be looking at the Treble Staff. The treble staff is basically the staff with the treble clef drawn at the beginning. The treble staff represents notes of high pitch. So therefore, music for instruments such as the flute, recorder and soprano saxophone would be written on the treble staff.
The lines and spaces of the treble staff are represented by a specific letter. The letters used on the staff are from the musical alphabet. These letters are A, B, C, D, E, F & G. The letters of the treble staff are not hard to remember because it label in a normal letter sequence. First you should note the structure of the staff, there is a line then a space, then a line then a space and it continues like that. Just as how the staff is designed with line and spaces following eah other, that is how the lines and space are label.
For example; the first line on the treble staff is E, so what letter would comes after E, the letter F. Therefore the letter F would go in the space that follows the E line because after a line there is a space.
The illustration below will show you the letter names of the lines and spaces of the treble staff. Please study them carefully. Remember, the staff is read from bottom to top.

Copyright (c) April 2011 by Carlinton Singh. All rights Reserved.
PLEASE REMEMBER TO POST YOUR COMMENTS.
Guitar Lesson Part 3 - Mary Had a Little Lamb
Hi everybody! Today is a great day for music. Today I want to show you how to play "Mary had a Little Lamb" on the guitar. This lesson will be a great one especially for person who have just started to play the guitar.
In our last guitar lesson we discussed the letter names of each fret and strings on the guitar. If you have not read that article as yet, please feel free to read it right now. By now, all of you who have been following my articles on how to play the guitar should know the letters of each string and fret. However, if you are not confident that you know them as yet, just go over the information that was given to you. But you still will be able to participate in this lesson. Now, below are the words and the letters that will be played on the guitar.
It is important for you to know that this method is used to help re-enforce the letter names on the guitar. So this lesson will help you find the letters B, A and G on your guitar easily.
Below are illustrations showing you where on the guitar you can find B, A and G. Once you know where the letters are then you can play this simple melody.
This illustration below shows us the location of the letters B, A and G. These letters will be used to play "Mary had a little Lamb". You should notice that B and G are in open position, while A is in close position.


Now, its your duty to practice this simple piece on your guitar. Make sure you play it in all the locations illustrated. You should also try to find out for yourself what other frets includes the letters B, A and G and also play the song. After playing this piece, I am sure that you will be able to located the letters B, A and G on your guitar in a number of frets and remember them when ever you are about to play a song.
Learn more guitar lessons with:
Jamorama Guitar Courses - Click Here Now!
Copyright (c) April 2011 by Carlinton Singh. All Rights Reserved.
PLEASE LEAVE YOUR COMMENTS.
In our last guitar lesson we discussed the letter names of each fret and strings on the guitar. If you have not read that article as yet, please feel free to read it right now. By now, all of you who have been following my articles on how to play the guitar should know the letters of each string and fret. However, if you are not confident that you know them as yet, just go over the information that was given to you. But you still will be able to participate in this lesson. Now, below are the words and the letters that will be played on the guitar.
It is important for you to know that this method is used to help re-enforce the letter names on the guitar. So this lesson will help you find the letters B, A and G on your guitar easily.
MARY HAD A LITTLE LAMB
Mary had a little lamb, little lamb, little lamb,
B A G A B B B A A A B B B
Mary had a little lamb; its fleece was white as snow.
B A G A B B B B A A B A G
Below are illustrations showing you where on the guitar you can find B, A and G. Once you know where the letters are then you can play this simple melody.
This illustration below shows us the location of the letters B, A and G. These letters will be used to play "Mary had a little Lamb". You should notice that B and G are in open position, while A is in close position.

Below is another way you can play "Mary had a little lamb" on the guitar, notice that you will be playing the the song one string that is, the 3rd string. Both A and B are closed while G is open.

Now here is another way you can play "Mary had a little lamb" on your guitar. The notes are located on the upper or lower strings.

Now, its your duty to practice this simple piece on your guitar. Make sure you play it in all the locations illustrated. You should also try to find out for yourself what other frets includes the letters B, A and G and also play the song. After playing this piece, I am sure that you will be able to located the letters B, A and G on your guitar in a number of frets and remember them when ever you are about to play a song.
Learn more guitar lessons with:
Jamorama Guitar Courses - Click Here Now!
Copyright (c) April 2011 by Carlinton Singh. All Rights Reserved.
PLEASE LEAVE YOUR COMMENTS.
Thursday, 7 April 2011
Piano/Keyboard lesson - Part 3 (Twinkle, Twinkle Little Star)
In our last Piano/Keyboard lesson, we looked at the letter names of the blacks keys (sharp and flat keys). By now you should know the letter name for each black and white key on the keyboard.
Let us take a look at the keyboard below to refresh our memory.


Let us take a look at the keyboard below to refresh our memory.
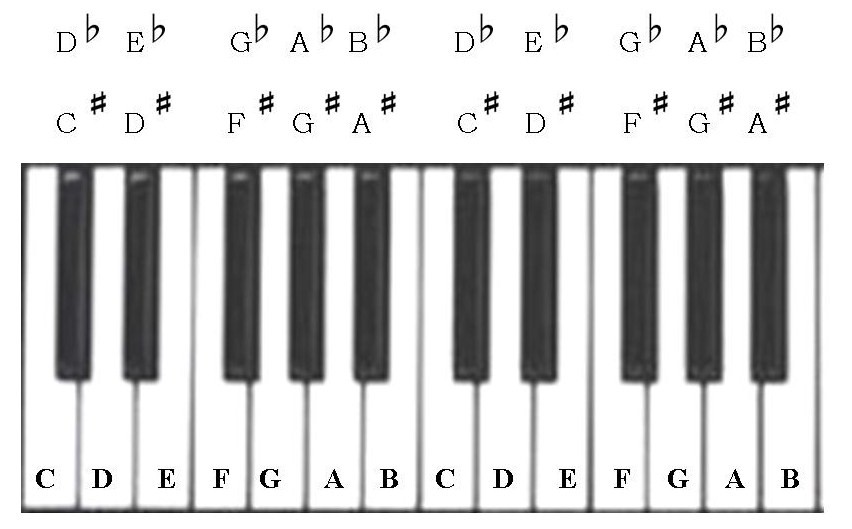
The diagram above shows all the letter names for each key on the keyboard. This illustration applies to all keyboard instrument such as the piano, organ, synthesizer etc.
Now, its time for you to re-enforce what you have learnt. The song below should help. Click on the song for a larger view.
Play the song within the middle section of your keyboard.

Hope you enjoy playing this piece.
Have a nice !
Copyright (c) 2011 by Carlinton Singh. All Rights Reserved.
Monday, 4 April 2011
Guitar Books and Materials at Amazon and Youtube.
Check out some useful guitar books at amazon.com.
There are several materials to choose from such as video tutorials, popular guitarist audio and Cds.
Feel free to explore youtube for as much information as possible about the guitar.
Remember! Practice Hard!
!!!Music is life and life is in the music so play it on.!!!
There are several materials to choose from such as video tutorials, popular guitarist audio and Cds.
Feel free to explore youtube for as much information as possible about the guitar.
Remember! Practice Hard!
!!!Music is life and life is in the music so play it on.!!!
Subscribe to:
Posts (Atom)